
We love our solid paper lanterns, but wanted to see what we could come up with to give them a little extra pizazz! These projects are our favorite easy ways to create a completely unique lighting setup for any room, and they were really inexpensive to make as well! Each lantern was transformed with simple items that can be found at any dollar store or your local grocer, and the process of making them was super fun! It would be a really fun project to do with the kids, or with your friends at an art-y party!
Project One: Mexicali Flower Power
 For this project, you’ll need:
- some patterned tissue paper. We used Mexicali flower paper from our stores, but you can use any pattern you like! You could do this with pictures or shapes cut out of newsprint, or by cutting shapes (like circles, hearts, or stars) out of solid tissue paper. You just want the paper you use to be not completely opaque (like pages of a magazine) because the light will not be able to pass through it as easily when the lantern is lit.
- scissors
- a paint brush
- glue (we used craft glue, mixed with water. You can use that, mod podge, or elmers glue mixed with water. . . more on that in a moment!)
- a paper globe lantern
Step 1:
 Cut out all the shapes you want to use to decorate your lantern. Because we wanted our lamp flowers to have a bit of an organic look as if they were falling from a big Mexicali flower tree, we cut out flowers in a variety of different shapes.
Step 2:
 Next, we made our own mod podge to affix our tissue paper pieces. We mixed one part water with one part white craft glue (Elmer’s works as well), and stirred it up until it was evenly blended.
Step 3:
 Using a paintbrush, we brushed a it of glue mixture onto the lantern. We learned a few things when we did this step! Because the paper of these particular flower cut-out paper lanterns was thinner in places, we had to use the glue sparingly, so as not to get the paper so wet that it would rip. This meant we basically just put a few dabs on at a time, roughly covering the area that would then house one of our tissue paper cut-outs. You want to use just enough glue to get the flower to stick to the lamp. Don’t worry about getting all the edges smoothed down, as that will be addressed in the next step. Also, we intended to use a large paintbrush, but found that a smaller one was best.
Step 4:
 Once you have put a bit of glue under the flower to get it to stay on the lamp, you can put more on top to get it to stick smoothly around the edges. You can do this piece by piece, or wait until you have all of your pieces lightly stuck to the lamp and do it all at once.
Step 5: Keep gluing, paying attention to how you want your shapes arranged. We liked the look of starting with a lot of bigger pieces toward the top, steadily decreasing in number and size moving toward the bottom.
Step 6:
 Hooray! So pretty!
There are so many possibilities with this idea; if you decide to decorate a paper lantern, we would love to see how it came out! Post a picture on the Mexicali Facebook page, and we will share your creative awesomeness with the world!
Project 2: Honeycomb Space Flower
 For this project, you’ll need:
- mini paper baking cups (we used about 200 to cover our small lokta paper globe lantern)
- a paint brush
- glue
- a paper globe lantern
Step 1:
 Using a paintbrush, brush craft glue onto the bottom of the paper cups. We found it was most efficient to put glue on several cups before affixing them, rather than one at a time.
Step 2:
 Starting at the top of the lantern, begin pressing the bottoms of the cups to the lantern body.
Step 3:
 When you are beginning, it may be easier to lay the lantern down flat as you affix the cups. Place them around the opening on the top of the lamp, then moving downward and continuing to attach them around the lantern in rows.
Step 4:
 As your rows get further down the lantern, you will need to hold it open as you go. Holding it gently from the inside, you can apply some pressure with your inside hand while you press the cups onto the outside to give it extra sticking power. Keep doing this until the whole lamp is covered.
Step 5:
 You did it! Now you have a super unique lantern!
If you decide to take on this paper lantern project, we would love to see how it came out! Post a picture on the Mexicali Facebook page, and we will share your creative awesomeness with the world!
Project 3: Chakra Rainbow Brite Light
 For this project, you’ll need:
- colorful tissue paper
- scissors
- a paint brush
- glue (we used craft glue, mixed with water. You can use that, mod podge, or elmers glue mixed with water. . . see step 2 in the Mexicali Flower Power lamp tutorial above)
- a paper globe lantern
Step 1:
 Figure out which colors you want to use, and in what order. We laid them out in order as we decided on the rainbow we wanted to create, thinking about rainbows in the sky and also the colors of the chakras.
Step 2:
 Cut the tissue paper in half, then in half again, and again. Then cut the strips you have created into small squares. You will line these up to create rainbow stripes on the lamp.
Step 3:
 Organize the pieces into piles by color. This may seem unnecessary, but it saves a lot of time in the long run!
Step 4:
 Using a paintbrush, we brushed a it of glue mixture onto the lantern. We learned a few things when we did this step! Because the paper of these particular flower cut-out paper lanterns was thinner in places, we had to use the glue sparingly, so as not to get the paper so wet that it would rip. This meant we basically just put a few dabs on at a time, roughly covering the area that would then house one of our tissue paper cut-outs. You want to use just enough glue to get the colored squares to stick to the lamp. Press the squares down as you go. Also, we intended to use a large paintbrush, but found that a smaller one was best.
Affix the squares in rows, starting at the top of the lantern and going all the way around it with each color.
Step 5:

Celebrate your rainbow success!
There are so many possibilities with this idea: try making stripes of different shades of blue for an undersea vibe, or just use your favorite colors. You could also alternate the colors in each row for a rainbow confetti look.
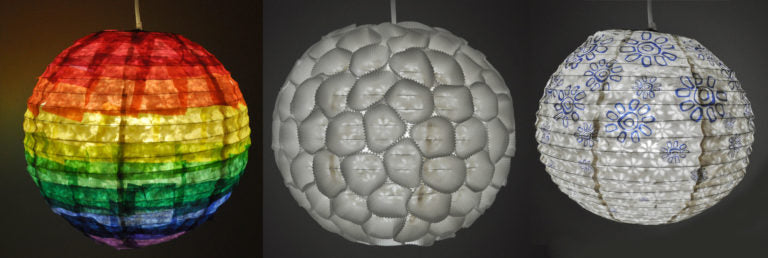
We hope you liked this tutorial! Paper lanterns are an awesome creative project, as the finished product is not only nice to look at but can completely change the mood of any space with the unique colors and shapes of its glow! If you decide to take on any of these paper lantern projects, we would love to see how it came out! Post a picture on the Mexicali Facebook page, and we will share your creative awesomeness with the world!
The post Mexicali DIY: How to Decorate a Plain Paper Globe Lantern appeared first on Mexicali Blues Blog.